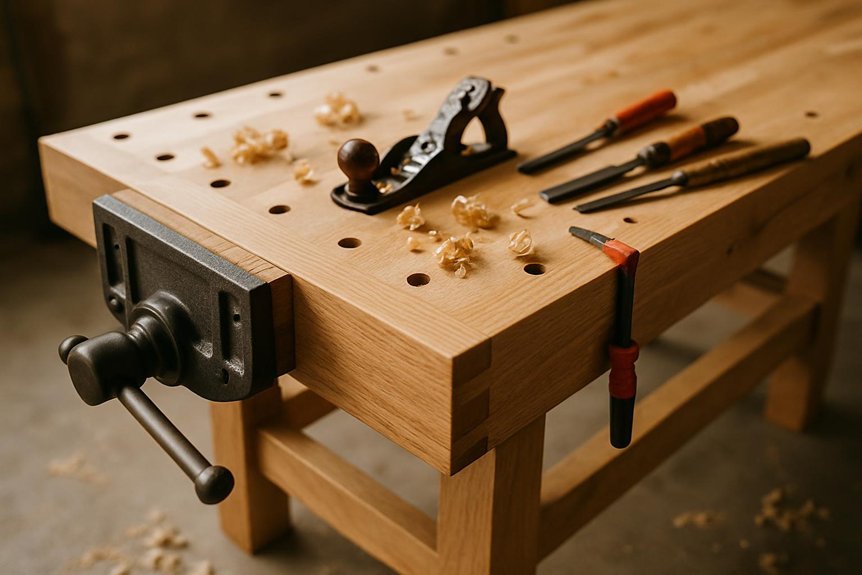
If you’re a dedicated woodworker, having the right workbench can make all the difference in your projects. A quality workbench needs to be stable, durable, and designed to meet the demands of your craft—whether you’re tackling intricate designs or large-scale builds.
In this roundup, we’ll explore three top-notch workbenches that blend heavy-duty construction with features that enhance your woodworking experience, including effective clamping systems, mobility options, and convenient power access.
Choosing the right workbench is crucial for your workflow. This guide is tailored for serious makers who want a workspace that supports their specific project needs.
We’ll cover stationary models ideal for long-term builds, portable options for those who need flexibility in their workshop, and hybrid designs that offer the best of both worlds. Each of these benches has been selected based on durability, functionality, and ease of use, ensuring they can withstand the rigors of frequent woodworking tasks.
Whether you’re setting up a permanent shop or need something that can easily adapt to your workspace, finding the right workbench is essential for achieving optimal results.
So, let’s dive into our top picks and discover the workbench that will elevate your woodworking game! Scroll down to find the perfect fit for your needs.
Worx Pegasus 2-in-1 Folding Work Table & Sawhorse (WX051)
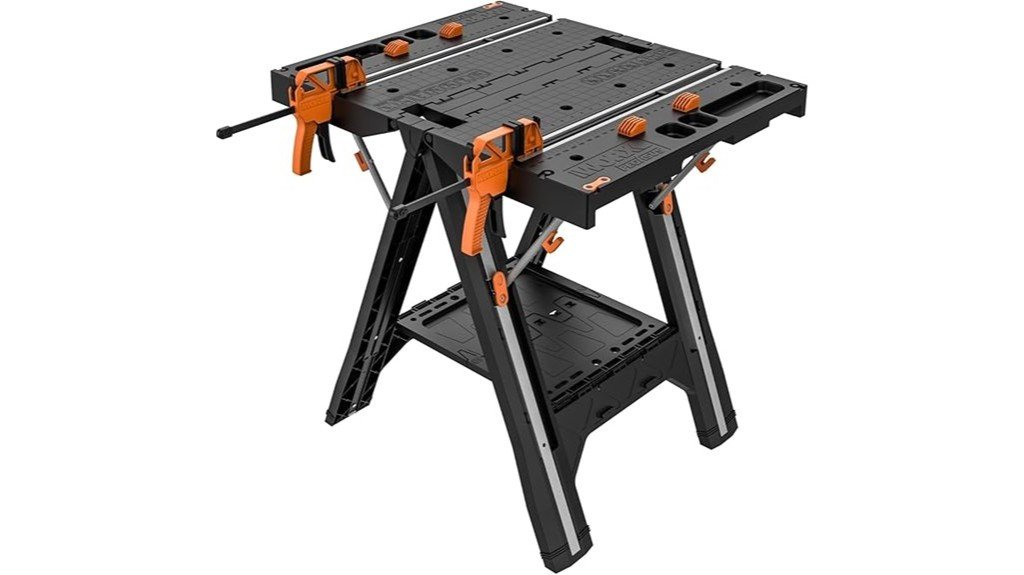
If you need a portable, space-saving work surface that still handles serious tasks, the Worx Pegasus 2-in-1 Folding Work Table & Sawhorse is an ideal pick—especially if you move between job sites or work in a small garage. You’ll appreciate its two-in-one design that converts quickly between workbench and sawhorse, steel and ABS construction, and compact folding profile that fits under your arm. It holds 300 lbs as a bench and 1,000 lbs as a sawhorse, includes two 24” quick clamps and four clamp dogs, and offers a built-in measuring guide. Note clamp limits and that it’s not a permanent bench.
Best For: DIYers, contractors, and anyone needing a portable, space-saving work surface that converts between a workbench and sawhorse for jobs in small garages, job sites, or on the go.
Pros:
- Lightweight, compact folding design that’s easy to carry and store while still supporting up to 300 lbs as a bench and 1,000 lbs as a sawhorse.
- Integrated clamping system with two 24″ quick clamps (up to 301 lbs clamp force) and four clamp dogs plus a built-in measuring guide for versatile project work.
- Compatible with other Worx support tables (Pegasus, Sidekick, Clamping Sawhorse) for expanded workspace; backed by a 3-year warranty and strong customer ratings.
Cons:
- Clamps can slip under higher torque (users report limits around 20 ft/lbs), so not a replacement for heavy-duty vises for demanding clamping needs.
- Some concerns about long-term durability despite good initial sturdiness—may not match a permanent shop workbench over many years.
- At 30 lbs and moderate footprint, it’s portable but still may be bulky for very tight storage situations or frequent single-handed transport.
Betterhood 48″ Adjustable Workbench on Wheels with Rubber Wood Top, Power Outlets and Pegboards

For woodworkers and hobbyists who need a mobile, heavy-duty work surface, the Betterhood 48″ Adjustable Workbench on Wheels delivers a compelling combination of strength and versatility. You get a 48 x 24 solid rubber wood top on a robust metal frame, reinforced with an extra support rod and rated for up to 2,000 lb, so heavy projects feel secure. Nine height settings (25.5–39.5 in) suit sitting or standing tasks; lockable TPR wheels provide mobility and stability. Built-in ETL power with four AC outlets and two USB ports, plus dual pegboards, keep tools and devices organized, though assembly can be fiddly.
Best For: Woodworkers, makers, and hobbyists who need a mobile, heavy-duty adjustable work surface for workshops, garages, or multipurpose spaces.
Pros:
- Solid 48″ x 24″ rubber wood top with extra support rod and 2,000 lb capacity for heavy-duty projects.
- Nine height settings (25.5–39.5″) and lockable wheels provide ergonomic flexibility and mobility.
- Built-in ETL-certified power strip (4 AC outlets, 2 USB) and dual pegboards for organized, convenient tool access.
Cons:
- Manual assembly can be fiddly; some users report unclear instructions and occasional missing parts.
- Power strip placement may be awkward for some layouts and cable management.
- At 60 lbs, still substantial to move despite wheels; limited to footprint of 48″ x 24″ for large projects.
Pony Portable Folding Work Table 2-in-1 Sawhorse & Workbench
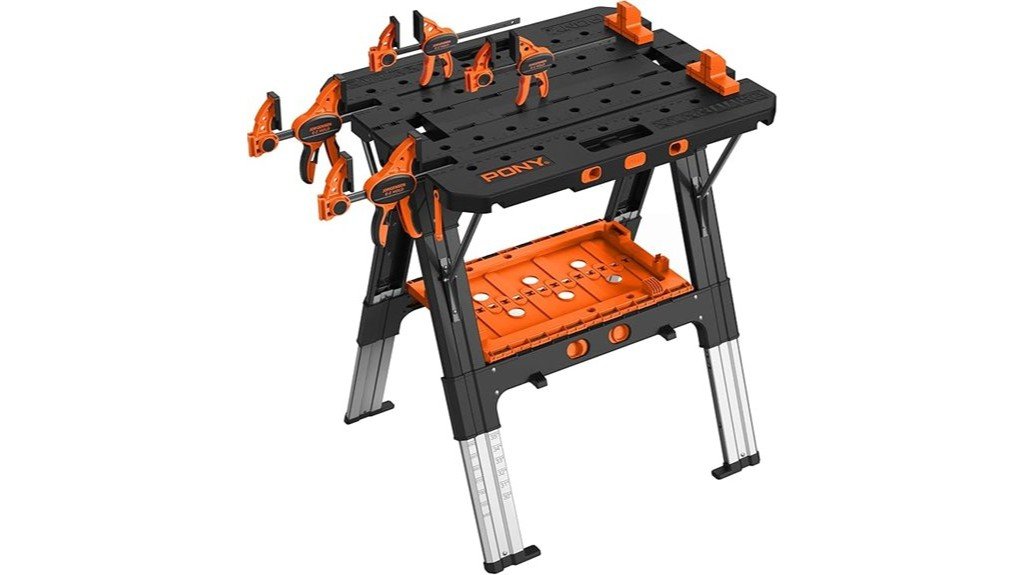
The Pony Portable Folding Work Table stands out as a smart choice for DIYers and hobbyists who need a lightweight, transportable work surface that still delivers impressive load capacity and versatility. You’ll appreciate its 2-in-1 design that shifts from sawhorse to bench, six height settings (25–35 inches), and sturdy aluminum frame that supports 500 lbs as a table and 1,000 lbs as a sawhorse. Weighing 31.9 lbs and folding flat, it fits in a car and stores compactly. Included clamps, bench dogs, and safety straps boost usefulness, though some users note transport and locking concerns; overall value is strong.
Best For: DIYers and hobbyists who need a lightweight, portable 2‑in‑1 work surface that balances high load capacity with easy storage and transport.
Pros:
- Lightweight, collapsible aluminum design (31.9 lbs) that folds flat for easy transport and car/garage storage.
- Versatile 2-in-1 functionality with six height settings (25–35″) and strong load ratings (500 lbs as table, 1000 lbs as sawhorse).
- Useful accessories included (two 12″ medium clamps, two 6″ light clamps, four bench dogs, two safety straps) for immediate use.
Cons:
- Can be awkward to carry when folded due to weight and lack of dedicated handles.
- Some users report stability issues if legs/locks are not adjusted or if locking mechanisms are not robust.
- Not intended for heavy professional daily use despite high load ratings; better suited for DIY and light contractor tasks.
Factors to Consider When Choosing Woodworking Workbenches
When choosing a workbench, you’ll want to match its size and load capacity to the projects you plan to tackle, since a cramped or underbuilt surface will slow you down and risk damage. Pay attention to materials and construction for long-term durability, while also considering portability and storage if you move the bench or work in a small shop. Finally, look for effective clamping and hold-down options, because secure workpieces make your cuts and joins safer and more accurate.
Workspace Size Needs
Curious how much room you really need for a woodworking bench? Measure your workspace first and verify the bench fits without crowding aisles or tool stations. Benches commonly range 24–48 inches wide; pick a width that suits your projects while leaving at least 30–36 inches of clear space in front for movement and clamping. Height matters: choose a fixed height that matches your stature or an adjustable model so you can work seated or standing comfortably, reducing fatigue and improving control. If floor space is tight, consider compact or folding designs that stow away when idle, freeing room for larger tasks. Finally, factor bench placement for lighting, dust collection access, and safe traffic flow to keep your shop efficient and pleasant.
Load Capacity Importance
Load capacity matters more than many hobbyists realize, since it determines how much weight your workbench can safely handle and directly affects what projects you can tackle without risking damage or injury. You should check rated capacities — many benches span roughly 200 to over 2,000 pounds — and match that to the heaviest tasks you plan, including tool loads and stacked materials. Remember some designs carry different capacities when used as a bench versus a sawhorse, so verify both configurations if you’ll repurpose the unit. Exceeding limits risks structural failure and injury, so prioritize conservative margins. Finally, inspect frame construction and support elements like rods and braces, since these features largely determine real-world capacity and long-term performance.
Material and Durability
You already thought about how much weight your bench can handle; now consider what it’s made of, because material and construction determine how well that capacity holds up over time. Choose steel or solid wood when you want long-term strength and rigidity; rubberwood tops also perform well, offering a resilient surface that some models rate up to 2,000 lbs. Aluminum frames are tempting for lighter tasks due to their low weight, but they won’t match steel for heavy, professional use. Pay attention to surface finish—a well-sealed or varnished top resists moisture, stains, and wear, extending service life. Finally, evaluate construction details like reinforced rods and adjustable components, since good design preserves stability and guarantees the bench endures regular, demanding woodworking.
Portability and Storage
When space is limited or you move between job sites, portability and storage become just as important as load capacity, so weigh features that make a bench easy to transport, set up, and stow. Choose a folding workbench if you need frequent mobility; when collapsed it often fits under an arm or into a vehicle, and compact folded dimensions let you tuck it into a garage corner or closet. Consider weight: lighter benches around 30 lbs travel easily, while 50–60 lb models add stability but can be cumbersome. Look for integrated mobility aids like wheels with brakes to roll the bench smoothly and lock it in place. Prioritize quick setup and teardown to keep your workflow efficient when moving between spaces.
Clamping and Hold-Downs
Portability and clever storage won’t help much if your workpiece won’t stay put, so a strong clamping and hold-down system is the next thing to check. You’ll want an effective clamping system that boosts functionality—some benches offer integrated clamps delivering up to 301 lbs. of force, which secures varied materials without guesswork. Multiple hold-down options, like clamp dogs, give you support for odd shapes or circular stock, letting you work more precisely. Look for adjustable and quick-release clamps that speed setup and handle different sizes, but don’t assume all clamps are equal: slipping under heavy loads is a real risk. Prioritize benches with reliable, tested clamping hardware so you’ll maintain safety, accuracy, and a smoother workflow.
Height Adjustability Options
A good height-adjustable workbench can transform your comfort and control in the shop, letting you set the surface anywhere from around 25.5 inches up to about 39.5 inches so you can work seated or standing without straining your back or arms. Choose models with multiple settings—some offer nine or more positions—so you can quickly match the bench to routing, planing, or assembly tasks. Look for easy, tool-free adjustment mechanisms that let you shift heights mid-project without wasting time. Ergonomics improve noticeably when the top aligns with your body, reducing fatigue during long sessions. In shared shops, adjustable benches make the space inclusive, accommodating different heights and working styles, and ensuring every maker can work efficiently and comfortably.
Power and Organization
Because power and tidy storage shape how smoothly your shop runs, choose a workbench that puts outlets and organization within easy reach so you can stay focused on the task instead of hunting for tools or extension cords. Pick benches with integrated AC outlets and USB ports so cordless chargers, lights, and small tools are always powered without draping extension cords across the floor. Prioritize built-in storage—drawers, cubbies, or a pegboard—to keep common tools visible and accessible, which saves minutes and reduces workflow interruptions. Confirm the bench supports clamps and bench dogs to secure stock for safer, more accurate cuts. Finally, consider a solid wood top like rubber wood for stability and, if possible, height adjustability so you can alternate between sitting and standing comfortably.
FAQ
How Do I Stabilize a Wobbly Wooden Workbench Permanently?
1. How can I start stabilizing my wobbly wooden workbench?
Begin by checking and tightening all fasteners to ensure they are secure. This simple step can often resolve minor wobbling issues.
2. What structural additions can I make for better stability?
Adding diagonal corner braces or metal gussets beneath the workbench top can significantly enhance rigidity and prevent wobbling.
3. What should I do if I find damaged joints?
Replace any damaged joints to maintain structural integrity. Damaged joints can compromise the stability of the entire workbench.
4. How can I level the legs of my workbench?
Level the legs by shimming them on a solid floor. Ensuring all legs are even will help eliminate wobbling.
5. What should I do with loose mortise-and-tenon or dowel joints?
Glue and clamp any loose mortise-and-tenon or dowel joints to reinforce their strength and stability.
6. How can I further reinforce the workbench structure?
You can use carriage bolts to secure the aprons to the legs, which will provide additional support and reduce movement.
7. Is there a way to triangulate the frame for more stability?
Yes, attaching a full-length lower shelf or stretcher will triangulate the frame, locking it into a rigid position.
8. Should I consider the floor type when stabilizing my workbench?
Absolutely. A solid and level floor is crucial for proper stabilization, as uneven surfaces can exacerbate wobbling.
9. How often should I check my workbench for stability?
Regularly inspect your workbench for any loose fasteners or joints, especially if you frequently use it for heavy projects.
10. Can I use any materials for corner braces or gussets?
While wood can be used, metal gussets or braces are preferred due to their added strength and durability for stabilization.
Can I Use a Workbench Outdoors Without Weatherproofing?
FAQs on Using a Workbench Outdoors Without Weatherproofing
1. Can I place a workbench outdoors without treating it?
No, placing an untreated workbench outdoors is not advisable. It can absorb moisture and lead to serious damage over time.
2. What happens to untreated wood when exposed to outdoor elements?
Untreated wood can warp, crack, and become prone to rot and insect infestations, significantly reducing its lifespan.
3. How can I protect my outdoor workbench?
To protect your outdoor workbench, seal all surfaces with an exterior-grade finish, paint, or oil designed for outdoor use.
4. Should I elevate my outdoor workbench?
Yes, elevating the workbench off the ground helps prevent moisture absorption from the soil, which can lead to deterioration.
5. Is it necessary to cover my workbench when not in use?
Covering your workbench when it’s not in use protects it from rain, snow, and other elements that can cause damage.
6. How often should I inspect my outdoor workbench?
Regular inspections are crucial; checking the workbench every few months can help identify any issues before they become serious.
7. What type of finish is best for weatherproofing a workbench?
An exterior-grade finish, such as marine varnish or heavy-duty outdoor paint, is recommended for effective weatherproofing.
8. Can I use any type of wood for an outdoor workbench?
Not all types of wood are suitable for outdoor use. Choose naturally weather-resistant woods like cedar or redwood for better longevity.
9. What are the signs that my outdoor workbench needs repairs?
Look for signs of warping, cracks, or soft spots, which indicate that the wood may be compromised and requires repair or replacement.
10. How can I extend the life of my outdoor workbench?
Regular maintenance, including cleaning, sealing, and timely repairs, will significantly extend the life of your outdoor workbench.
What Finishes Protect Against Glue and Solvent Stains?
FAQs on Finishes That Protect Against Glue and Solvent Stains
1. What types of finishes are best for resisting glue stains?
Polyurethane, epoxy, and catalyzed lacquer are ideal for resisting glue stains due to their chemical-resistant properties.
2. How does epoxy protect against stains?
Epoxy creates a hard, impermeable surface that offers excellent resistance to both glue and solvent stains.
3. What advantages does polyurethane provide?
Polyurethane provides durable surface protection and is easier to repair compared to other finishes, making it a practical choice.
4. Is catalyzed lacquer effective against solvent stains?
Yes, catalyzed lacquer dries quickly and offers strong resistance to solvents, making it suitable for various applications.
5. How many coats of finish should I apply?
It’s recommended to apply multiple thin coats of your chosen finish for optimal protection against stains.
6. Should I sand between coats?
Yes, sanding between layers helps ensure better adhesion and a smoother final finish.
7. Is it necessary to fully cure the finish?
Absolutely, allowing the finish to cure fully before heavy use is crucial for achieving maximum stain resistance.
8. Can I test the finish before applying it to my project?
Testing the finish on scrap wood is highly recommended to ensure compatibility and satisfaction with the results.
9. What is the best way to apply these finishes?
Using a brush or spray application can yield good results, but always follow the manufacturer’s instructions for the best application method.
10. Are there any specific conditions to consider when applying these finishes?
It’s best to apply these finishes in a well-ventilated area and at recommended temperatures for optimal curing and performance.
Are There Workbench Features That Aid Dust Collection?
FAQs on Workbench Features for Dust Collection
1. What is an integrated downdraft top?
An integrated downdraft top is a feature that allows dust and debris to be pulled downwards into a vacuum system. This design helps keep the workspace cleaner during operations.
2. How does a perforated tabletop assist with dust collection?
A perforated tabletop has holes that enable a shop vacuum to draw dust down through the surface. This design enhances dust collection efficiency while working on projects.
3. What are dust ports, and why are they important?
Dust ports are openings along the edge of the benchtop that facilitate local extraction of dust. They help target specific areas where dust is generated, improving overall cleanup.
4. Why should storage be enclosed and sealed?
Enclosed and sealed storage prevents dust from accumulating within the workspace. This design helps maintain a cleaner environment and minimizes the spread of dust.
5. How can routing hoses under the bench improve dust collection?
Routing hoses under the bench keeps them organized and out of the way while connecting to a central collector. This setup reduces clutter and enhances airflow for effective dust extraction.
6. What is a sacrificial, replaceable top surface?
A sacrificial top surface is a layer on the workbench that can be easily replaced after wear and tear. This feature simplifies maintenance and cleanup, allowing users to keep the surface in optimal condition.
7. Can I retrofit my existing workbench for better dust collection?
Yes, you can retrofit an existing workbench by adding features such as downdraft tops, dust ports, or a new perforated surface. These enhancements can significantly improve dust collection.
8. What tools or materials are needed to create a downdraft workbench?
To create a downdraft workbench, you will need a vacuum system, a suitable tabletop material (like MDF), and a way to integrate perforations or holes. Basic woodworking tools will also be required for assembly.
9. How do I maintain my dust collection system?
Regularly check and empty your vacuum or dust collector to prevent clogs. Inspect hoses and ports for blockages, and clean or replace filters as needed to maintain optimal performance.
10. Are there design considerations for maximum dust control?
Yes, consider the layout and workflow of your workspace to strategically place dust ports and vacuum connections. Ensure that the downdraft feature is aligned with high-dust activities for effective capture.
How Do I Repair Gouges in a Hardwood Benchtop?
1. How do I start repairing gouges in my hardwood benchtop?
Begin by cleaning any debris from the gouge to prepare the area for repair. Ensure the edges of the gouge are smooth by sanding them lightly.
2. What should I use to fill shallow gouges?
For shallow gouges, mix wood glue with sawdust from the same wood species. Press the mixture into the gouge, let it cure completely, and then sand it flush with the surrounding surface.
3. What is the best approach for deeper gouges?
For deeper gouges, create a neat recess using a router or chisel. Then, fit a patch or apply epoxy, clamp it until set, and finish by planing and sanding the area.
4. How can I ensure the filler matches my hardwood?
Choose a filler that closely matches the color and grain of your hardwood. If necessary, you can create a custom filler by mixing sawdust from your benchtop with wood glue.
5. What tools are necessary for gouge repair?
Essential tools include sandpaper, a router or chisel, clamps, and possibly a putty knife for applying filler. Having wood glue and sawdust on hand is also important for mixing your own filler.
6. How long should I wait for the filler to cure?
The curing time can vary depending on the type of glue or epoxy used, but generally, allow at least several hours or according to the manufacturer’s instructions before sanding and finishing.
7. What finishing options can I use after repair?
After the gouge repair is complete and sanded, you can apply stain or oil to match the existing finish of your benchtop. This will help blend the repair with the surrounding wood.
8. Is sealing necessary after the repair?
Yes, sealing the repaired area is important for protection against moisture and wear. Use an appropriate finish that matches the rest of your benchtop.
9. Can I repair gouges myself, or should I hire a professional?
Many gouge repairs can be successfully done by DIY enthusiasts with basic tools and materials. However, for extensive damage or if you’re unsure, consulting a professional may be wise.
10. How can I prevent future gouges in my benchtop?
To prevent future gouges, use cutting boards for food preparation and avoid dragging heavy objects across the surface. Regular maintenance, such as sealing and oiling, can also help protect the wood.
Final Thoughts
You’ve seen three durable, practical benches—each suited to different needs: the Worx Pegasus for portability and clamping versatility, the Betterhood 48″ for heavy-duty, stationary projects with built-in power and storage, and the Pony for a balance of portability and function. Consider capacity, top material, mobility, and clamping options when choosing. Pick the bench that matches your workspace, project scale, and workflow, and you’ll get years of reliable performance.