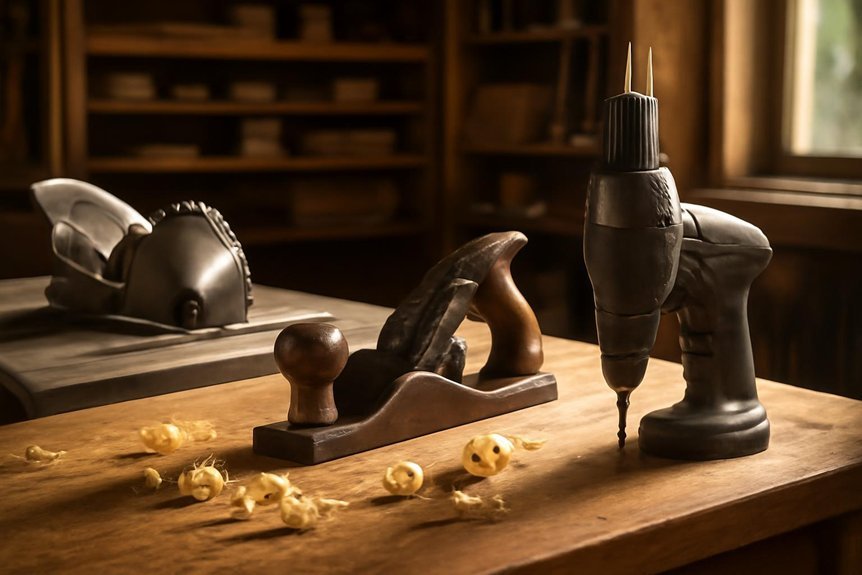
Are you a DIY enthusiast looking to elevate your woodworking skills? If so, you know that the right tools can significantly enhance your crafting experience.
In this roundup, we’ll introduce you to three must-have tools for your home woodshop that will help you tackle projects with ease and precision. Whether you’re sanding, cutting, or shaping, these products are designed to deliver professional results and solve common woodworking challenges.
When selecting tools for your woodshop, it’s important to consider durability, ease of use, and versatility. The right tool should not only be reliable but also versatile enough to handle a variety of tasks, allowing you to maximize your creativity without getting bogged down by equipment limitations.
We understand that investing in quality tools can make all the difference in the success of your projects, so we’ve carefully curated our picks based on performance and user satisfaction.
Ready to upgrade your woodworking game? Keep scrolling to discover our top recommendations for essential tools that will transform your home woodshop into a creative haven.
WEN Benchtop Belt and Disc Sander (6502T)
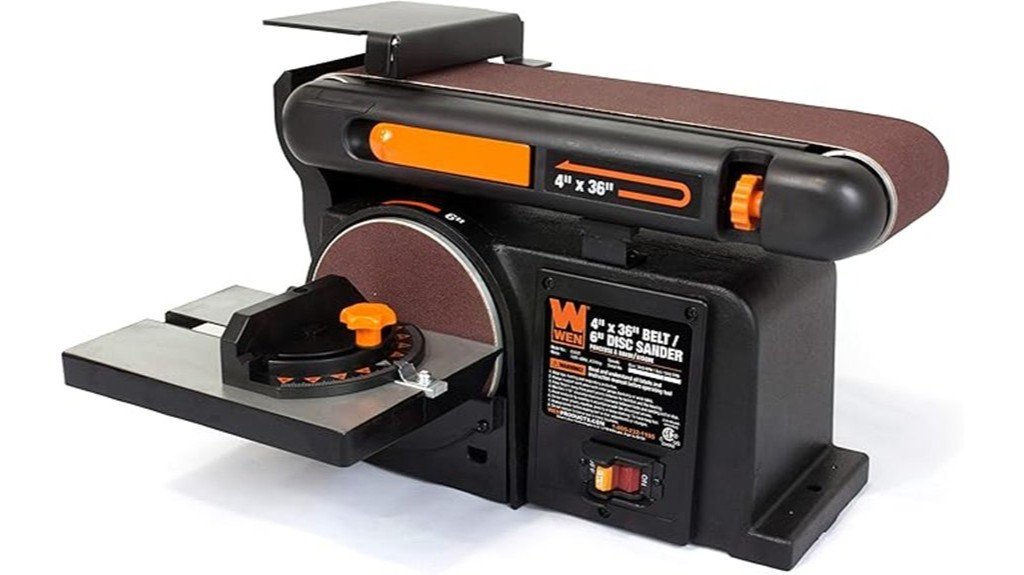
If you’re looking for a powerful tool that can tackle a variety of sanding tasks in your home woodshop, the WEN Benchtop Belt and Disc Sander (Model 6502T) is a fantastic choice. This two-in-one machine features a 4 x 36-inch belt and a 6-inch disc, making it perfect for everything from smoothing edges to removing jagged spots. With a 4.3 Amp motor, it won’t bog down under pressure. Plus, the sturdy cast iron base keeps things steady while you work. Just don’t forget to connect your dust extractor to the 2.25-inch port, and you’ll be sanding like a pro in no time!
Best For: Hobbyists and DIY enthusiasts looking for a versatile and powerful sanding tool for home projects.
Pros:
- Versatile: Handles a variety of sanding tasks, including smoothing edges and removing jagged spots.
- Powerful Motor: 4.3 Amp motor provides sufficient power to prevent bogging down during heavy use.
- Sturdy Base: The cast iron base minimizes vibrations and stabilizes the machine during operation.
Cons:
- Dust Port Design: Some users have expressed concerns about the effectiveness of the dust port design.
- Plastic Fence: The lightweight plastic fence has received criticism for its stability and durability.
- Lack of Locking Mechanism: Users have suggested improvements, such as adding locking mechanisms to the fence for better precision.
DEWALT 20V MAX XR Jig Saw (DCS334B)
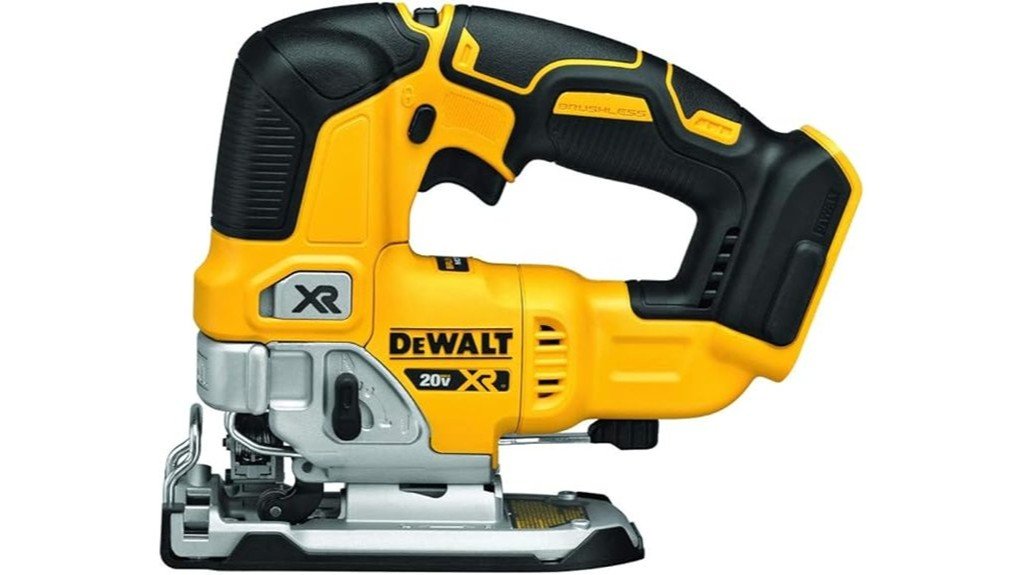
The DEWALT 20V MAX XR Jig Saw (DCS334B) is a fantastic choice for woodworkers who crave power and precision in a lightweight package. Weighing just 4.2 pounds, it’s easy to maneuver while delivering a speedy 3,200 strokes per minute. With its brushless motor, you get longer runtime and efficient performance. You’ll love the variable speed control, allowing you to adjust the cutting speed to fit your project. Plus, the bright LED light and integrated dust blower keep your line of sight clear. With its ergonomic design and quick blade changes, this jig saw is a reliable addition to your woodshop!
Best For: The DEWALT 20V MAX XR Jig Saw (DCS334B) is best for woodworkers and DIY enthusiasts seeking a powerful, portable tool with precision cutting capabilities.
Pros:
- Lightweight design at just 4.2 pounds for easy maneuverability.
- Brushless motor for longer runtime and efficient performance.
- Variable speed control and integrated LED light for enhanced precision and visibility.
Cons:
- No battery or charger included, requiring additional purchases.
- Some users find it heavier compared to corded models.
- Limited to DEWALT 20V MAX batteries, which may not appeal to users with other battery systems.
CRAFTSMAN V20 Cordless Drill/Driver Kit (CMCD700C1)
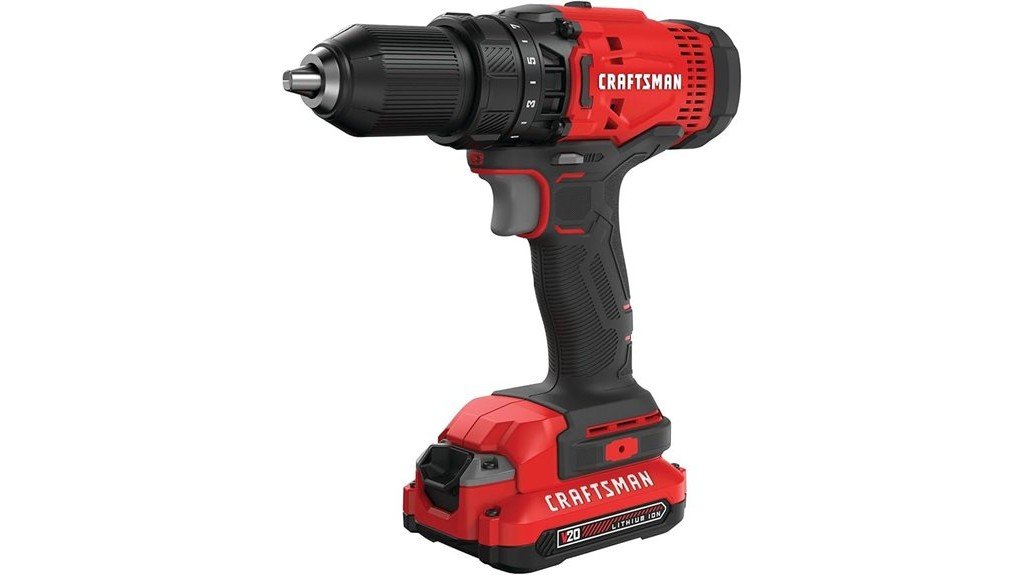
Looking for a reliable drill that won’t let you down during your home projects? The CRAFTSMAN V20 Cordless Drill/Driver Kit (CMCD700C1) is perfect for you! With a powerful motor producing 280 unit watts out, this drill boasts a 2-speed gearbox, letting you switch from 0-350 RPM to 0-1,500 RPM easily. Its keyless chuck means quick bit changes, saving you time. Plus, the included 20V max Lithium battery charges in 60 minutes or less. Weighing just 4.33 pounds, it’s easy to handle. With a 3-year warranty and a stellar 4.7-star rating from customers, this drill is a must-have for your woodshop!
Best For: Homeowners and DIY enthusiasts looking for a reliable and efficient cordless drill for various projects.
Pros:
- High-performance motor delivers 280 unit watts out for effective drilling and driving tasks.
- Quick charging with a 20V max Lithium battery that fully charges in 60 minutes or less.
- Lightweight design at 4.33 pounds makes it easy to handle for extended periods.
Cons:
- Limited drilling capacity in wood is only 0.5 inches, which may restrict larger projects.
- Amperage of 1.3 Amps may not be suitable for heavy-duty applications.
- No included carrying case for easy transport and storage.
Factors to Consider When Choosing Essential Tools for a Home Woodshop
When you’re setting up your home woodshop, you’ll want to reflect on a few key factors to make the best choices for your tools. From power source options to how much space you have, every detail matters in creating your perfect workspace. Plus, don’t forget to take into account your budget and safety features to keep both your wallet and yourself safe while you work on those awesome projects!
Power Source Options
Choosing the right power source for your home woodshop can make a huge difference in how smoothly your projects go. You can pick between corded electric tools or battery-powered options. Corded tools usually provide consistent power, making them great for heavy-duty tasks. On the other hand, battery-powered tools offer portability, letting you work without being tied to an outlet. Plus, these tools often come with lithium-ion batteries that charge quickly and last longer, perfect for moving around. When choosing, check the voltage and amp ratings because higher numbers mean more power. Also, think about compatibility across your tools—having the same batteries can save you time and money. Happy woodworking!
Tool Versatility
Tool versatility is a game changer in your home woodshop, especially since it lets you tackle a wider range of projects without needing a ton of different machines. Imagine using a benchtop sander that not only sands but also smooths surfaces—perfect for everything from edge finishing to surface prep! Versatile tools often let you adjust speed and angle, helping you achieve different results and spark your creativity. Plus, many come with attachments, making it easy to switch tasks quickly. This way, you keep your productivity high and your workspace tidy. Investing in multi-functional tools saves money too, as they combine several functions into one, meaning you won’t need to clutter your shop with tools you barely use.
Space and Size
Creating a home woodshop can be an exciting adventure, especially when you think about all the projects you could tackle. But first, you need to take into account your space. Make sure you have enough room for your tools without cramping your style—no one wants to trip over a benchtop sander! Measure each tool’s dimensions, as some can take up more space than you’d think. Aim for at least 3 feet of clearance around larger tools for safety and easy access. Don’t forget about vertical space! Wall-mounted racks or shelves can keep your essentials handy without cluttering the floor. Finally, good ventilation and lighting are vital for comfort and effectiveness, so make your woodshop a place you love to be!
Budget Considerations
When you’re setting up your home woodshop, it’s crucial to keep your budget in mind. Start by establishing a clear budget range that covers both the tools you need and any future maintenance costs. Look for tools with good performance ratings and customer reviews to guarantee you’re getting value over time. Don’t forget the cost of consumables like sandpaper and drill bits, as they can add up quickly! Consider tools that come with warranties or solid customer support for extra peace of mind. Finally, invest in versatile tools that can handle multiple tasks. This way, you won’t need to buy more tools than necessary, maximizing your budget efficiency while still building that awesome workshop!
Safety Features
Setting up your home woodshop isn’t just about picking the coolest tools; safety should be at the top of your list, too. Start by choosing tools with built-in safety features like blade guards and emergency stop switches. These can really help minimize accidents. Look for tools that have dust collection systems, making it easier to breathe and see while you work. Adjustable speed controls are a bonus, letting you tailor the tool’s operation and reduce kickback. Also, check for safety certifications; they mean the tools have passed rigorous testing. Finally, opt for ergonomic designs with anti-vibration handles to keep you comfortable and safe during those longer projects. Your hands will thank you later!
Maintenance and Support
Choosing the right tools for your home woodshop isn’t just about their shiny features; it’s also about how well they’ll serve you over time. First, check the warranty period—longer warranties mean the manufacturer believes in their product’s durability. Next, look for tools with good customer support; having someone to help you troubleshoot is a lifesaver. You’ll also want to guarantee replacement parts and accessories are available, as this keeps your tools running for years. Tools designed for easy maintenance make your life easier, especially when changing blades or bits. Finally, read customer reviews to get the scoop on reliability and support experiences. After all, you want tools that will stick with you through thick and thin!
FAQ
What Safety Gear Do I Need for My Woodshop?
1. What type of safety glasses should I use in my woodshop?
Look for safety glasses that meet ANSI Z87.1 standards, ensuring they provide adequate protection against flying debris. Consider options with side shields for additional coverage.
2. Why is hearing protection necessary in a woodshop?
Woodworking tools can produce loud noises that may cause hearing damage over time. Using earmuffs or earplugs can help prevent long-term hearing loss.
3. When should I wear a dust mask in the woodshop?
A dust mask is essential when sanding, cutting, or working with materials that generate fine dust. It helps filter out harmful particles, protecting your lungs.
4. What kind of gloves should I wear while woodworking?
Opt for gloves that provide a good grip and are resistant to cuts, such as leather or synthetic options. Avoid loose-fitting gloves, as they can get caught in machinery.
5. Is an apron really necessary in a woodshop?
A sturdy apron protects your clothing and can shield you from sharp tools and materials. It also often includes pockets for easy access to small tools.
6. Can I use regular glasses instead of safety glasses?
Regular glasses do not provide adequate protection against impact and flying debris. Safety glasses are designed specifically to meet safety standards.
7. What features should I look for in hearing protection?
Choose hearing protection that is comfortable and provides the necessary noise reduction rating (NRR). Look for options that allow you to communicate while still protecting your hearing.
8. How do I choose the right dust mask?
Select a dust mask with a N95 rating or higher for effective filtration of fine particles. Ensure it fits snugly to prevent dust from entering around the edges.
9. Are there any specific types of gloves to avoid in a woodshop?
Avoid gloves made from materials that are too thin or loose-fitting, as they do not provide sufficient protection and can easily get caught in machinery.
10. What is the importance of wearing safety gear consistently?
Consistent use of safety gear minimizes the risk of injuries and long-term health issues while woodworking. It creates a safer working environment and promotes good habits.
How Do I Maintain My Woodworking Tools?
FAQs on Maintaining Woodworking Tools
1. How often should I clean my woodworking tools?
It’s best to clean your tools after each use to prevent residue buildup. Regular cleaning helps maintain their performance and longevity.
2. What is the best way to clean my tools?
Use a soft cloth and appropriate cleaning solutions, such as mineral spirits or soap and water, depending on the material. Ensure all dirt and debris are removed, especially from tight spaces.
3. How can I tell when my blades need sharpening?
If you notice a decrease in cutting efficiency or rough edges on your workpieces, it’s time to sharpen your blades. Regular inspection will help you identify when they start to dull.
4. What is the best method to sharpen woodworking blades?
You can use a sharpening stone, a honing guide, or a powered sharpening system. Always follow the manufacturer’s recommendations for the best results.
5. How do I lubricate my woodworking tools?
Use a light machine oil or lubricant specifically designed for tools. Apply it to moving parts and joints, ensuring they can operate smoothly without excess buildup.
6. How should I store my woodworking tools?
Store your tools in a dry, clean environment, ideally in a dedicated toolbox or on a pegboard. Proper storage protects them from damage and keeps them organized.
7. What should I inspect for wear and tear?
Look for any signs of rust, cracks, or excessive wear on blades and moving parts. Regular inspections help catch issues early before they affect performance.
8. When should I replace parts on my tools?
Replace parts when they show significant wear, damage, or if they no longer perform as intended. Always refer to the manufacturer’s guidelines for replacement recommendations.
9. Can I use oil on all types of tools?
Not all tools require the same type of oil; check the manufacturer’s instructions. Some tools may need specific lubricants to avoid damaging their components.
10. What are the benefits of maintaining my tools regularly?
Regular maintenance ensures tools operate efficiently, prolongs their lifespan, and improves the quality of your woodworking projects. Well-maintained tools can also enhance safety during use.
What Are the Best Wood Types for Beginners?
FAQ 1: What are the best wood types for beginners?
Softwoods like pine, cedar, and fir are ideal for beginners due to their workability and availability.
FAQ 2: Why are softwoods recommended for beginners?
Softwoods are generally easier to cut, shape, and join, making them more forgiving for novice woodworkers.
FAQ 3: Are softwoods expensive?
No, softwoods tend to be less expensive than hardwoods, which is beneficial for beginners looking to save money while learning.
FAQ 4: Where can I find softwoods?
Softwoods like pine, cedar, and fir are readily available at most home improvement stores and lumber yards.
FAQ 5: Can beginners use hardwoods?
While beginners can use hardwoods such as oak or maple, they are typically more challenging to work with and may require more specialized tools.
FAQ 6: What is the difference between softwoods and hardwoods?
Softwoods come from coniferous trees and are generally lighter and easier to work with, while hardwoods come from deciduous trees and are denser and tougher.
FAQ 7: How can I gain confidence in woodworking?
Start with simple projects using softwoods to build your skills, then gradually progress to more complex designs and materials.
FAQ 8: What tools do I need for working with softwoods?
Basic tools like a saw, hammer, and sandpaper are sufficient for working with softwoods, allowing beginners to start without a large investment.
FAQ 9: Are there other softwoods suitable for beginners?
Yes, besides pine, cedar, and fir, other softwoods like spruce and hemlock can also be good options for novice woodworkers.
FAQ 10: How can I choose the right type of wood for my project?
Consider the project’s requirements, your skill level, and the wood’s availability and cost when selecting the right type of wood.
How Can I Organize My Woodshop Efficiently?
1. What is the first step to organizing a woodshop?
The first step is to designate specific zones for tools, materials, and ongoing projects. This helps in creating a systematic layout that improves workflow.
2. How can I store tools effectively in my woodshop?
Use wall-mounted racks and pegboards to keep tools visible and easily accessible. Labeling these storage solutions can help you find items quickly.
3. What type of storage bins should I use for materials?
Opt for labeled storage bins that are sturdy and stackable. This maximizes vertical space and keeps materials organized by type or project.
4. How can I maintain a clear workspace in my woodshop?
Regularly clean and declutter your workspace after each project. This practice ensures that you have a functional area to work efficiently.
5. How often should I declutter my woodshop?
It’s advisable to declutter your woodshop regularly, ideally after finishing a project or at least once a month. This habit prevents accumulation of unnecessary items.
6. What is the benefit of labeling storage solutions?
Labeling storage solutions enhances organization by allowing you to quickly identify the contents of bins and racks, saving you time during your work sessions.
7. How can I improve accessibility in my woodshop?
Arrange tools and materials based on frequency of use, keeping the most commonly used items within easy reach. This layout minimizes time spent searching for tools.
8. Should I group tools by type or function?
Grouping tools by type (e.g., hand tools, power tools) and function (e.g., cutting, sanding) can help you find what you need faster and streamline project execution.
9. What role does lighting play in woodshop organization?
Adequate lighting is crucial for a well-organized woodshop as it improves visibility and reduces the risk of accidents. Consider using task lighting in work areas.
10. How can I optimize vertical space in my woodshop?
Utilize wall-mounted shelves, racks, and pegboards to take advantage of vertical space. This approach keeps the floor clear and maximizes your storage options.
11. What should I do if I run out of storage space?
If you run out of storage space, evaluate items you no longer need and consider donating or discarding them. Additionally, look for creative solutions like under-bench storage or multi-functional furniture.
What Should I Consider for Dust Collection Systems?
FAQ 1: What factors influence the size of a dust collection system?
The size of your dust collection system primarily depends on the dimensions of your shop and the types of tools you will be using. Larger shops with multiple machines may require a more robust system.
FAQ 2: How do I determine the types of tools I’ll be using?
Consider the specific woodworking or metalworking tools you plan to operate in your shop. Tools like table saws, routers, and sanders generate varying amounts of dust and require different collection capacities.
FAQ 3: Why is it important to consider the volume of dust generated?
The volume of dust produced will dictate the capacity and efficiency of your dust collection system. A system that can’t handle the dust output may lead to poor performance and a less clean workspace.
FAQ 4: What should I look for in system accessibility?
Choose a dust collection system that is easy to reach for maintenance and operation. Accessibility ensures you can quickly empty bags or bins and perform necessary upkeep without hassle.
FAQ 5: How can I ensure proper airflow in my dust collection system?
Proper airflow is achieved by selecting the right duct size and layout for your system. Ensure that the ductwork is free of obstructions and is appropriately sized for your tools to maintain efficient airflow.
FAQ 6: What filtration options should I consider?
Look for systems with high-efficiency particulate air (HEPA) filters or similar technologies that capture fine dust. The right filtration system will enhance air quality and reduce health risks.
FAQ 7: How often should I maintain my dust collection system?
Regular maintenance is crucial; check filters and bags monthly, and clean or replace them as needed. This will help maintain optimal airflow and keep your workspace clean.
FAQ 8: Can I install a dust collection system myself?
Yes, many dust collection systems are designed for DIY installation. However, ensure you follow the manufacturer’s guidelines and consider consulting a professional if you’re unsure.
FAQ 9: What are the safety considerations for dust collection systems?
Always ensure your dust collection system is properly grounded to prevent static electricity buildup. Additionally, using fire-resistant materials for ductwork can help mitigate fire hazards.
FAQ 10: How do I determine the best location for my dust collection system?
Place the dust collector in a location that minimizes duct length and bends, which can impede airflow. Ideally, it should be close to the machines that generate the most dust for efficient collection.
Final Thoughts
In summary, having the right tools can make all the difference in your woodshop adventures. The WEN sander, DEWALT jig saw, and CRAFTSMAN drill are perfect companions for tackling any project, big or small. They’re user-friendly and packed with features that help you create professional-quality work without breaking a sweat. So, gather your gear, release your creativity, and let those woodworking dreams take shape! Remember, every masterpiece starts with the right tools in hand.