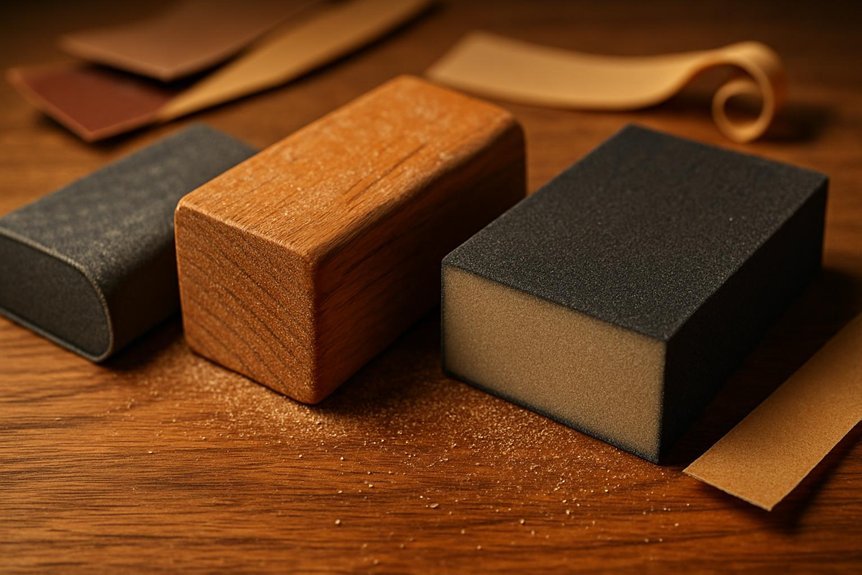
Are you a woodworking enthusiast or a DIYer looking to achieve a flawless finish on your projects? Selecting the right sanding block is crucial for transforming raw wood into a beautifully smooth surface.
In this roundup, we’ve curated the best sanding blocks that cater to various needs, helping you tackle different stages of sanding with ease.
First up is the Sandpaper and Sanding Sponge Kit, which offers a diverse range of grits. This kit is perfect for those who need versatility, allowing you to seamlessly transition from rough to fine sanding.
If you’re working on intricate details or tight spots, the LVANJI micro detail set is your best friend. It provides precision where it counts, ensuring no corner is left untouched.
Lastly, for those longer sanding sessions, the Tool Aid block prioritizes ergonomic comfort, reducing hand fatigue while you work toward that perfect finish.
With these options, you’ll find solutions that make your sanding tasks smoother and more accurate, so you can focus on creating rather than battling with tools.
Ready to discover which sanding blocks will elevate your woodworking projects? Scroll down to explore our top picks!
85pcs Sandpaper and Sanding Sponge Kit with Hand Sand Block (180-1000 Grit)
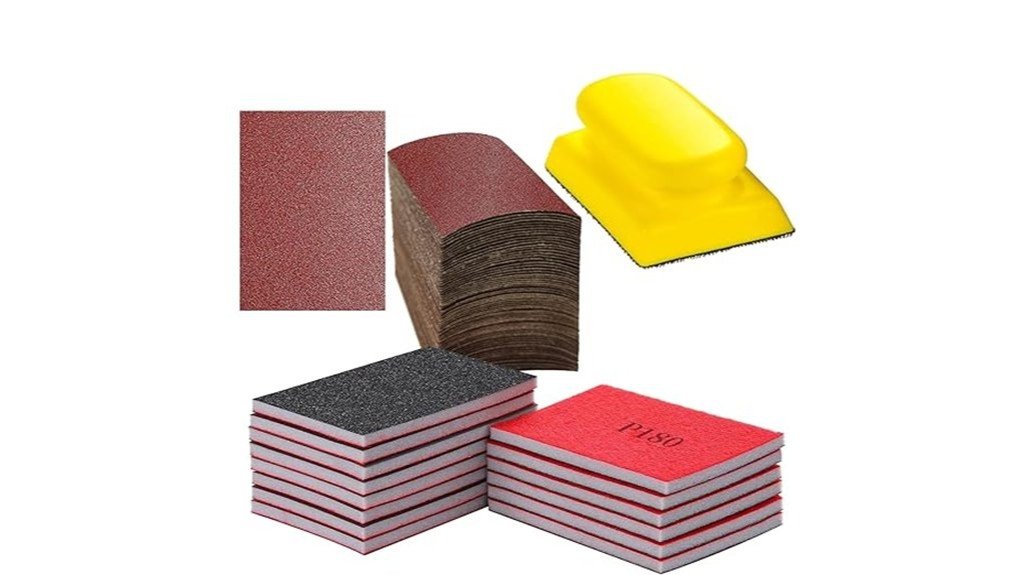
If you’re tackling a range of woodworking tasks—from smoothing rough stock to preparing fine surfaces for finish—the 85-piece sandpaper and sanding sponge kit is a great fit because it gives you a full progression of grits (180–1000) and both flat sheets and flexible sponges for varied surfaces. You’ll get 70 sheets (ten of each grit), 14 sponges (two of each), and a soft, comfortable 3×4-inch hand block with hook-and-loop attachment for quick changes. Aluminum oxide abrasives resist clogging and static, while wet/dry sponges handle contours and can be trimmed for tight spots, improving control and results.
Best For: DIY woodworkers and hobbyists who need a complete progression of grits and a mix of flat sheets and flexible sponges for sanding both flat and contoured surfaces.
Pros:
- Wide grit range (180–1000) with multiple sheets per grit for full sanding progression.
- Includes wet/dry sanding sponges and a soft, hook-and-loop hand block for comfort and versatility on uneven surfaces.
- Durable aluminum oxide abrasives with anti-clogging and anti-static properties for longer life and cleaner sanding.
Cons:
- Hand block size (3×4 in) may be small for large surface areas, requiring more time for big projects.
- Only two sponges per grit—may run out faster on heavy sponge use compared with sheets.
- Not a power-sander compatible kit (designed for 3×4 in block), so additional adapters may be needed for some tools.
LVANJI 90PCS Micro Detail Sander Kit (3-in-1) for Wood Crafts and DIY Polishing Projects

For hobbyists and small-scale woodworkers who need precise control in tight spots, the LVANJI 90PCS Micro Detail Sander Kit stands out as a versatile, budget-friendly choice; its 3-in-1 PU foam sanding block and nine-grit range (60–400) let you tackle everything from heavy material removal to fine polishing without switching tools. You’ll appreciate the compact 3.5 x 1 inch block that fits into corners and reduces hand fatigue, while hook-and-loop backing makes grit swaps quick and secure. Aluminum oxide paper resists tearing and clogging, giving reliable performance on wood, plastic, and metal for many small DIY projects.
Best For: Hobbyists and small-scale woodworkers who need a compact, versatile sander for precise control and detailed work in tight spaces.
Pros:
- Compact 3.5 x 1 in ergonomic PU foam block that reduces hand fatigue and reaches corners easily.
- Wide grit range (60–400) with 90 premium aluminum oxide sheets for heavy removal to fine polishing.
- Hook-and-loop backing for quick, secure sandpaper changes and reliable performance on wood, plastic, and metal.
Cons:
- Sandpaper may wear faster on heavy-duty tasks, requiring more frequent replacements.
- Handle material and foam block durability may be less robust than professional-grade tools.
- Not suitable as a replacement for power sanders on large surfaces or high-volume projects.
Tool Aid S&G (89800 Sanding Block, 5
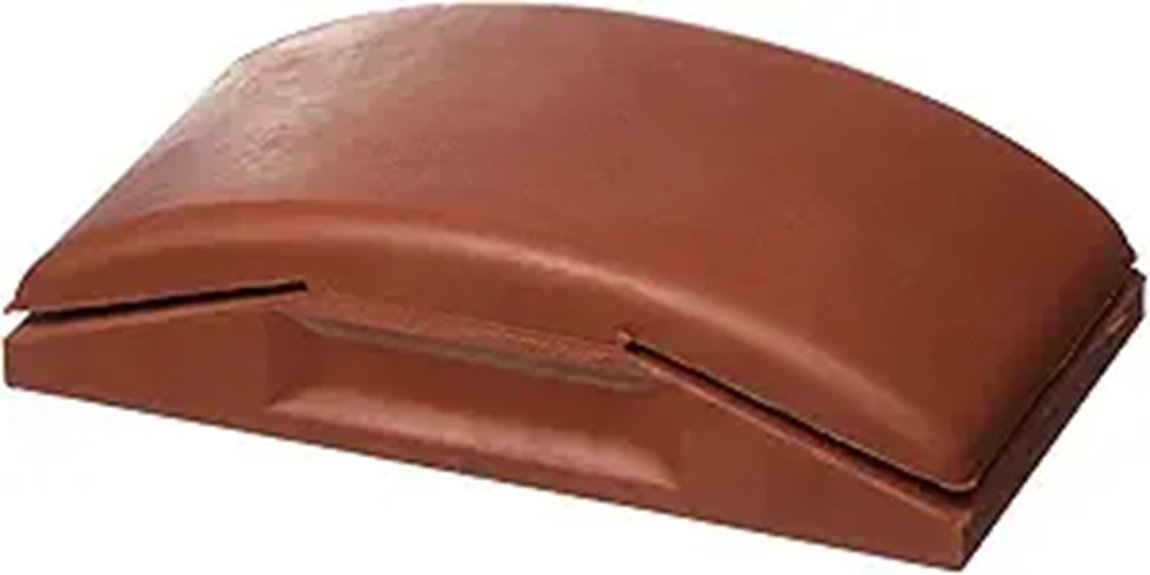
The Tool Aid S&G 89800 five-inch sanding block is a solid pick if you want a dependable manual sander that handles cabinet work and auto-body touch-ups with equal confidence; its firm rubber body and hefty, ergonomic shape give you good control and leverage during longer sanding sessions. You’ll get a five-inch disc platform that fits medium 80-grit paper, ideal for shaping and removing finish quickly without power tools. Weighing about 0.7 pounds, it feels balanced in hand, and users praise its classic design. Fitment can be fiddly at first, but proper loading solves it; overall, it’s durable, affordable, and effective.
Best For: DIYers and auto-body hobbyists who need a sturdy, manual sanding block for cabinet refinishing and touch-up shaping without power tools.
Pros:
- Durable, firm rubber body provides good control and leverage for longer sanding sessions.
- Five-inch disc fits 80-grit medium paper ideal for rapid material removal and shaping.
- Hefty, ergonomic design feels balanced and comfortable in hand.
Cons:
- Sandpaper can be fiddly to fit at first and may require proper loading to avoid issues.
- Manual operation is slower and more labor-intensive than power sanders for large jobs.
- Limited to medium (80-grit) sanding — may require additional blocks or papers for finer finishing.
Factors to Consider When Choosing Sanding Blocks for Wood Finishing
When choosing a sanding block for wood finishing, you’ll want to match the grit range to the stage of the job so coarse papers remove material quickly and fine grits deliver a smooth finish. Consider the block material and its ergonomics—rubber, foam, or hard plastic affects how the block conforms to curves and how comfortable your grip will be during long sessions. Also check size and shape for the parts you’ll sand and whether the block accepts hook-and-loop discs, since compatibility makes swapping grits faster and keeps the work consistent.
Grit Range Selection
Because the grit range you choose determines how quickly you remove material and how smooth the final surface will be, selecting the right set of sanding blocks is one of the most important decisions in wood finishing. You’ll typically find coarse 40–80 grits for aggressive removal, medium grits for shaping and feathering, and fine 180–400 grits for smoothing prior to finish. Choosing a wider range makes your sanding workflow flexible, letting you progress from rough shaping to polishing without switching systems. For hardwoods, include very fine 600–1000 grits to achieve the glassy surface that accepts stain and sealers evenly. Start coarse and step progressively finer to avoid deep scratches, and match grit choices to wood hardness—softer species usually respond better to finer grits.
Block Material Type
After you’ve picked grits that carry you from rough shaping to a glassy finish, the material of the sanding block becomes the next decision that affects how those grits perform in your hands. You’ll choose among rubber, foam, and plastic blocks, each offering different flexibility and support for specific tasks. Rubber blocks give firm support and durability for heavier work, while foam conforms to curves and uneven surfaces but may wear faster. Harder materials keep their shape and distribute pressure evenly, producing consistent results on flat panels, whereas softer blocks prevent digging on contours. Also consider how well the block material pairs with your abrasive—certain papers bond and last longer on firm surfaces. Match material to the project for best control and longevity.
Ergonomics and Grip
Although often overlooked, ergonomics and grip make a marked difference in how effectively you sand and how long you can work without fatigue, so prioritize blocks that feel secure in your hand and distribute pressure evenly across the abrasive. Choose blocks with lightweight construction and comfortable, soft grips to cut down hand strain during long sessions, and you’ll finish more accurately. Look for models that promote even pressure distribution and proper alignment; they reduce sanding gouges and improve surface uniformity. A secure hook-and-loop attachment speeds pad changes and keeps the paper from slipping, preserving consistent contact with the wood. Compact, maneuverable designs help you control detailed areas while maintaining comfort, so test a block’s feel before committing to a purchase.
Size and Shape Fit
When you pick a sanding block, size and shape should match the workpiece so you get consistent contact without damaging nearby surfaces; smaller blocks around 3–4 inches give you the control needed for tight spots and intricate details, while larger, flatter blocks cover more area quickly on broad, even surfaces. Choose a block whose dimensions suit the area so you avoid over-sanding edges or missing spots, and consider contoured or shaped blocks when working on curved or uneven pieces because they conform better than flat ones. Opt for a lightweight design with ergonomic features, like soft grips or compact silhouettes, to cut hand fatigue during long sessions and improve handling, which translates directly into cleaner, more accurate wood finishing results.
Hook-and-Loop Compatibility
If you want fast sandpaper changes and steady sanding pressure, choose a hook-and-loop compatible block that matches the type of discs or sheets you use; these systems let you swap grits in seconds and keep abrasive backing firmly in place so you don’t fight slippage or uneven wear. You’ll appreciate how secure attachment preserves consistent pressure across the surface, preventing gouges and uneven finish. Look for standardized sizes so one block accepts multiple grits and minimizes tool clutter. Durable hook-and-loop fabric matters—inspect stitching and bond strength so the grip holds up after repeated changes. These designs also tend to improve dust management, reducing clogging and extending abrasive life. Overall, compatibility saves time and produces more predictable results.
Wet Vs Dry Use
A clear choice between wet and dry sanding can make a big difference in your final result, so you’ll want to weigh the strengths of each method before you start. Wet sanding uses water or lubricants to cut dust, reduce clogging, and produce a smoother finish, which makes it ideal for delicate varnish or paint work where surface damage must be avoided. Dry sanding removes material faster, so it’s better for initial shaping, leveling, and working with rougher grits. Choose sanders or sponges rated for wet/dry use when you need versatility; they handle contours and complex shapes well and let you switch methods without changing tools. Match the method to the material and stage of work for the best outcome.
Durability and Wear
Because durability determines how long your sanding block and abrasive will perform under real working conditions, you should pay close attention to the materials and construction before you buy. Choose block materials—rubber or foam—based on how much resilience you need; rubber holds shape under pressure, foam compresses for delicate work. Match high-quality abrasives to the block: aluminum oxide papers resist wear and last longer than cheaper options. Consider grit: finer grits above 400 will generally wear more slowly than coarse grits below 180, so use them when longevity matters. A secure hook-and-loop backing keeps sandpaper from tearing or detaching, which directly improves lifespan. Finally, simple maintenance—regularly cleaning dust and debris—will extend both the block and abrasive life, keeping performance consistent.
Surface Contour Handling
When you’re matching sanding blocks to the shapes you’ll be working on, think beyond size and grit and focus on contour capability, because the block’s profile and flexibility determine how well it follows curves, chamfers, and tight corners. Choose shapes that match your project: convex and concave profiles adapt to rounded moldings, while thin, narrow blocks reach tight grooves. Flexible blocks conform to uneven surfaces, giving consistent contact and reducing sanding gouges, though firmer blocks suit flat panels. Match block size to task—small for detail, large for broad areas—and prefer hook-and-loop systems for fast paper swaps when switching grits. Finally, ergonomic grips cut fatigue during long sessions, letting you control pressure and maintain smooth, accurate results across complex contours.
FAQ
Can Sanding Blocks Be Used on Metal and Plastic?
FAQs about Using Sanding Blocks on Metal and Plastic
1. Can sanding blocks be used on metal?
Yes, sanding blocks can effectively be used on metal. It’s important to start with coarser grits to remove rust and shape the surface before moving to finer grits for polishing.
2. What abrasives should I use when sanding metal?
For metal, use coarser grits or non-woven pads initially. As you refine the surface, switch to finer grits for a smooth finish.
3. How do I prevent overheating when sanding metal?
Apply steady pressure while sanding and periodically check the surface temperature. This helps to keep the metal component cool during the process.
4. Can I use sanding blocks on plastic?
Yes, sanding blocks can also be used on plastic. However, it’s crucial to choose fine grits to avoid damaging the material.
5. What should I do before sanding plastic?
Always test inconspicuously before starting the main project. This helps to ensure that the chosen grit doesn’t melt or scratch the plastic.
6. What grit should I start with when sanding plastic?
Start with fine grits when sanding plastic to minimize the risk of damage. If necessary, you can adjust the grit based on your test results.
7. Is it necessary to secure the workpiece while sanding?
Yes, securing the workpiece is essential for safety and effectiveness. It helps to maintain control and stability while sanding.
8. What protective gear should I wear when sanding?
Always wear appropriate protective gear, such as a dust mask and safety goggles. This protects you from dust and debris generated during sanding.
9. Why is it important to clean debris between grit steps?
Cleaning debris between grit steps prevents scratches and ensures a smoother finish. It removes particles that could cause imperfections in the final surface.
10. Can I use the same sanding technique for both materials?
No, different techniques are needed for metal and plastic due to their material properties. Adjust your approach based on the material you are working with for optimal results.
How Do I Clean and Maintain Foam Sanding Blocks?
FAQs on Cleaning and Maintaining Foam Sanding Blocks
1. How do I initially clean foam sanding blocks?
Begin by knocking loose dust off the sanding block. This removes surface debris before washing.
2. What cleaning solution should I use?
Use warm water combined with a mild soap to effectively clean the foam sanding blocks without damaging them.
3. How do I rinse the sanding blocks?
Rinse the blocks under warm water while gently squeezing them to flush out any grit and soap residue.
4. What if I have stubborn particles stuck in the foam?
For stubborn particles, use a soft brush to gently dislodge them, being careful not to twist the block too hard to avoid damage.
5. How do I know when the sanding block is clean?
Rinse until the water runs clear, which indicates that all soap and debris have been removed.
6. What should I do after rinsing?
Squeeze out excess water gently to help the block dry faster without compromising its shape.
7. How should I dry foam sanding blocks?
Air-dry the blocks fully on a flat surface, avoiding direct heat sources that could warp or damage them.
8. What is the best way to store foam sanding blocks?
Store the blocks in a sealed container to keep them dry and free from contamination.
9. How can I extend the life of my foam sanding blocks?
Proper cleaning and storage practices will help maintain their abrasive quality and extend their lifespan.
10. Can I use harsh chemicals to clean my sanding blocks?
No, avoid using harsh chemicals as they can damage the foam material of the sanding blocks. Stick to mild soap instead.
Are There Hypoallergenic Sanding Sponge Options?
1. What are hypoallergenic sanding sponges?
Hypoallergenic sanding sponges are designed to minimize skin and respiratory irritation, typically made from latex-free foam and adhesives.
2. How do I identify hypoallergenic sanding sponges?
Look for labels that indicate “latex-free,” “low-dust,” or “anti-allergen” to ensure the product meets hypoallergenic standards.
3. What grit options should I choose for hypoallergenic sanding sponges?
Selecting fine-grit options can help reduce airborne particles, making them a better choice for those with sensitivities.
4. Should I take precautions when using sanding sponges?
Yes, wearing gloves and a dust mask is recommended, along with working in a well-ventilated area to further minimize irritation.
5. What if I have severe sensitivities to materials?
If you have severe sensitivities, it’s advisable to test a small area first or consult the material safety data provided by the manufacturer.
6. Are all sanding sponges hypoallergenic?
No, not all sanding sponges are hypoallergenic; it’s important to specifically look for those labeled as such.
7. Can hypoallergenic sanding sponges still create dust?
While they are designed to produce less dust, some airborne particles may still be generated during sanding, so precautions should still be taken.
8. Where can I find hypoallergenic sanding sponges?
These sponges can often be found at hardware stores, specialty craft shops, or online retailers that focus on safe materials.
9. Are hypoallergenic sanding sponges more expensive?
Pricing can vary; however, hypoallergenic options may be slightly more expensive due to their specialized materials.
10. Do hypoallergenic sanding sponges have any performance differences?
Generally, they perform similarly to regular sanding sponges but are designed with materials that reduce allergenic reactions.
Can Sanding Blocks Be Used Wet for Wet-Sanding Finishes?
1. Can I use sanding blocks for wet-sanding finishes?
Yes, sanding blocks can be used for wet-sanding finishes, provided they are suitable for water use.
2. What types of sanding blocks are best for wet-sanding?
Blocks made from rubber or closed-cell foam are ideal for wet-sanding due to their water resistance.
3. What are the benefits of wet-sanding?
Wet-sanding minimizes dust, results in a smoother finish, and helps prevent sandpaper from clogging.
4. How often should I change the water while wet-sanding?
It’s advisable to change the water frequently to maintain optimal surface quality during the sanding process.
5. What pressure should I apply while wet-sanding?
Use light, even pressure to avoid gouging the surface while wet-sanding.
6. What type of sandpaper should I use for wet-sanding?
You should use wet/dry sandpaper specifically designed for use with water.
7. How do I ensure compatibility with my finish when wet-sanding?
Always check the compatibility of your abrasive materials with the finish you are working on to avoid damage.
8. Why is rinsing important during wet-sanding?
Rinsing often helps maintain surface quality and ensures consistent abrasion by removing debris.
9. Can I use regular sandpaper for wet-sanding?
No, regular sandpaper is not suitable for wet-sanding as it can deteriorate in water.
10. Is there a specific technique for wet-sanding with sanding blocks?
Yes, maintain a steady hand and use a smooth, sweeping motion to achieve an even finish while wet-sanding.
Do Sanding Blocks Create Static That Attracts Dust?
1. Do sanding blocks create static electricity?
Yes, sanding blocks can generate static electricity, particularly those made from synthetic materials and fine grits.
2. Why does static attract dust when sanding?
Static electricity builds up from friction during the sanding process, causing particles and dust to cling to the surface.
3. Which types of sanding blocks are more likely to produce static?
Synthetic sanding blocks and those with fine abrasive grits are more prone to generating static.
4. Does humidity affect static electricity during sanding?
Yes, working in slightly higher humidity can help reduce static electricity buildup.
5. How can I minimize dust attraction while sanding?
Using antistatic cloths, tack rags, or switching to natural-material sanding blocks can help minimize dust attraction.
6. What should I do if I notice excessive dust cling while sanding?
If you notice excessive dust cling, regularly wiping surfaces with a damp cloth or vacuuming the area can help keep dust levels down.
7. Are foam-backed abrasives more likely to attract dust?
Yes, dry sanding with foam-backed abrasives may result in more dust cling due to increased static generation.
8. What materials are less likely to create static during sanding?
Natural-material sanding blocks tend to create less static compared to synthetic options.
9. How does the grit size of sandpaper affect static generation?
Finer abrasive grits are more likely to build up static electricity, leading to increased dust attraction.
10. Is it necessary to clean surfaces after sanding to avoid finish issues?
Absolutely. Regularly cleaning and vacuuming surfaces is essential to prevent dust from compromising your final finish.
Final Thoughts
You’ve seen three top sanding blocks that’ll improve your wood finishing: the versatile Sandpaper and Sanding Sponge Kit for broad grit choices, the LVANJI Micro Detail Sander Kit for tight spots and precision, and the ergonomic Tool Aid block for comfortable, consistent pressure. Choose based on your project’s detail level, grit needs, and how long you’ll be sanding; with the right block, you’ll get a smoother surface, fewer touch-ups, and a more professional final result.